Better Documenting your BizTalk Solutions
The BizTalk Documenter has been available for many years on Codeplex for different BizTalk versions, starting with 2004 all the way to 2013 R2. The Documenter for 2004, 2006, 2006 R2 and 2009 can be found here. Some years later, a version for BizTalk 2010 was created. Last year, MBrimble and Dijkgraaf created a newer version which also supports BizTalk 2013 and 2013 R2. They did a great job; all improvements and fixes are listed here.
As in many things in life, there is always room for further improvement. While using the BizTalk 2013 Documenter, we realised that some changes could be done to better document BizTalk Solutions. I downloaded the source code and did some changes for my own, but then after sharing with the team what I had done, they invited me to collaborate in the project. I created the BizTalk 2013 Documenter 5.1.7.1 for BizTalk 2013 with some fixes and improvements.
I will share here not only the changes that I did, but some tips that I consider can help you to better document your BizTalk solutions. If you would like to implement them, please make sure you have got the latest version of the Documenter.
##1. Leverage the BizTalk Documenter
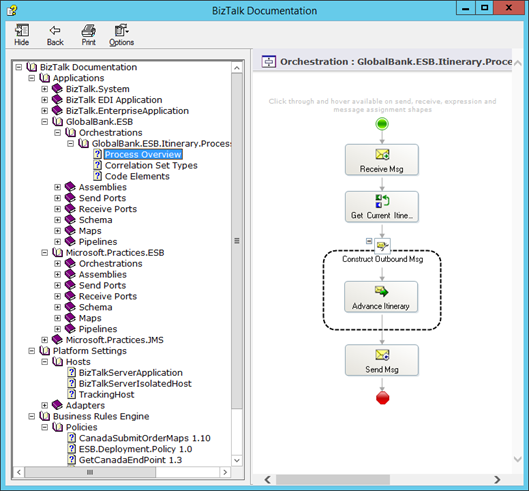
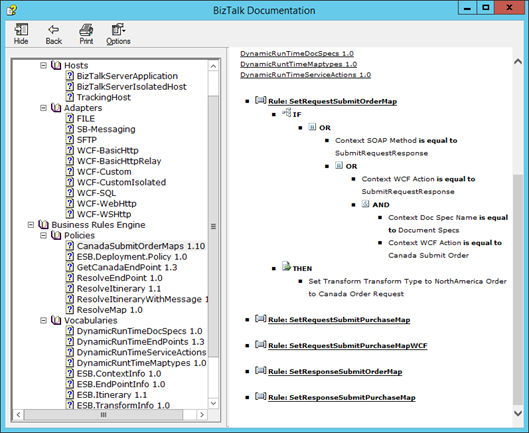
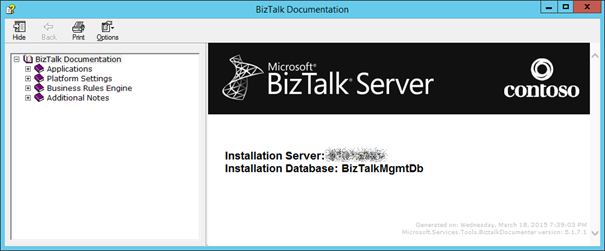
The first and obvious tip is to leverage the BizTalk Documenter. This tool allows you to create a CHM file describing your BizTalk environment and BizTalk Solutions. The first main section of the generated documentation contains your BizTalk Applications, listing all their artefacts and providing a navigable and very graphical documentation of all artefacts. The second main section describes the platform settings like hosts and adapters. The third main section documents BRE policies and vocabularies. You can expect an output similar to the one shown below.
##2. Use embedded documentation as much as possible
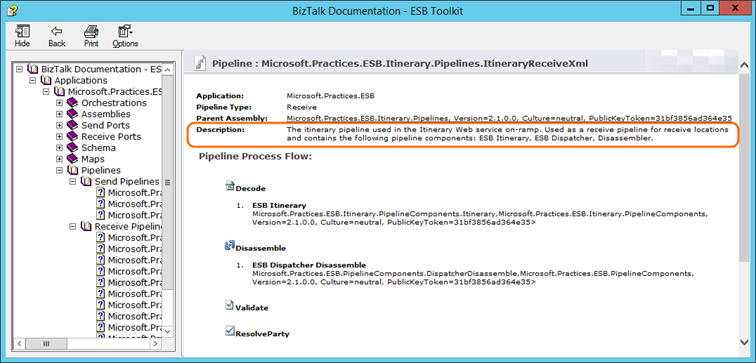
The practice of embedding documentation can be applied to your BizTalk Solutions. Using the BizTalk artefact’s description field within the Admin Console allows you to describe the purpose and function of each artefact and keep this always visible for administrators and developers. If you use the BizTalk Deployment Framework you can easily replicate your artefact’s description on all you environments by exporting applications’ bindings.
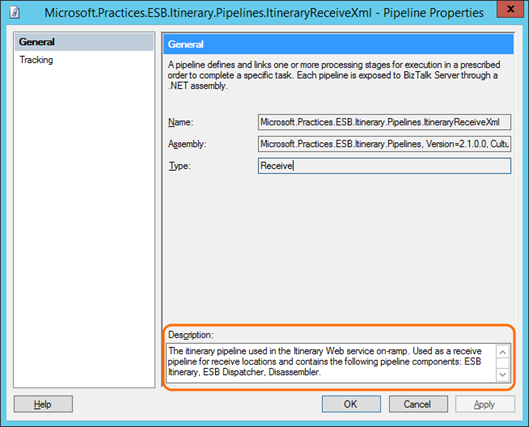
In our projects, we wanted to fully use embedded documentation for the BizTalk Solutions, but the previous Documenter has some minor bugs and Receive Ports, Schemas and Pipelines did not include the description field as part of the generated documentation. I’ve fixed them by updating some “.xslt” files and a class of the BizTalkOM library; and now the output includes description for all different artefacts.
##3. Include your ESB Itineraries as part of your documentation
The BizTalk ESB Toolkit provides a lot of functionality which allows and simplifies the implementation of an Enterprise Service Bus; and ESB Itineraries are usually a key component of these solutions. That said, when they are part of a solution, itineraries should be within the documentation to fully understand the solution as a whole.
However, itineraries are not documented in the BizTalk Documenter out-of-the-box. One way to do it is to create a web page which briefly describes the itinerary and attach it to the documentation. There is a simple and easy way to do it. The first step is to create a Word document, including a picture of the itinerary designer, a description of its purpose and functionality, and the configuration of the resolvers. Then, after creating this document, save it as a Single File Web Page “.mht”.
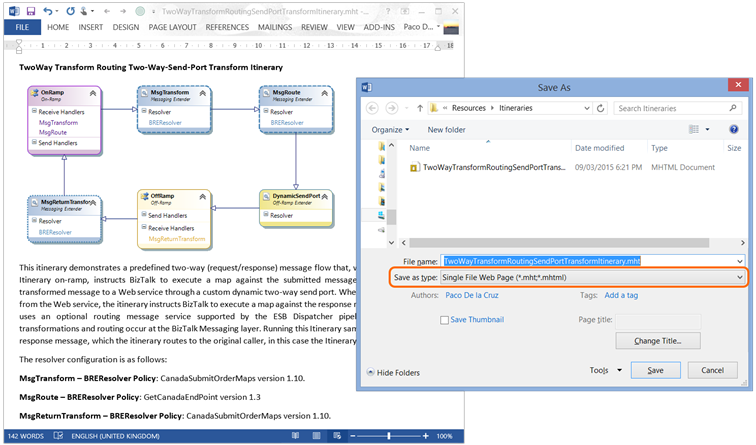
I’ve introduced a change to the BizTalk Documenter to accept not only “.htm” and “.html” files as additional resources, but “.mht” files also. The big advantage of this is that documentation which includes images can be created on Word, saved as a “.mht” file and easily added to the BizTalk documentation.
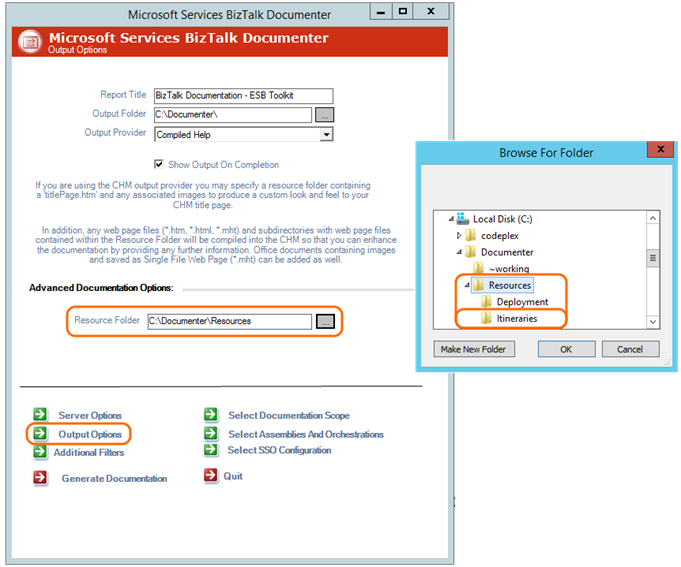
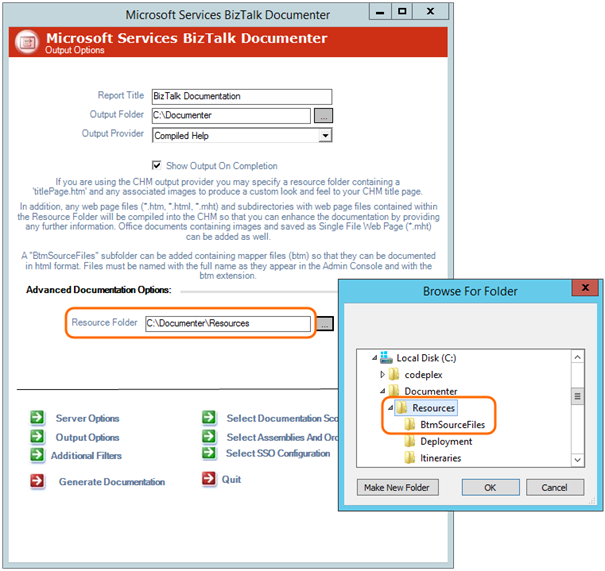
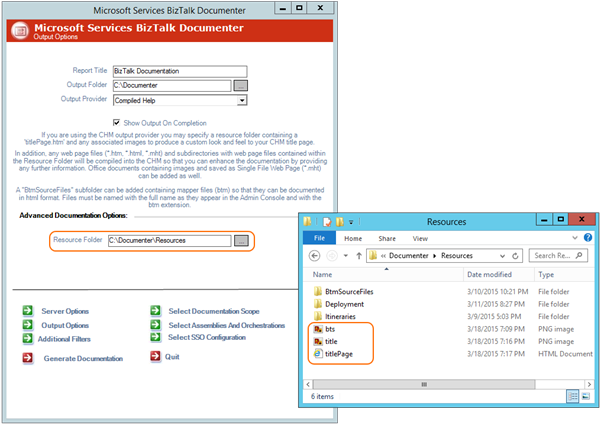
Once created the documentation for each itinerary, they should be saved in a subfolder which can be called “Itineraries”. I suggest this folder name to have a clear structure in the generated documentation, but it can be set according the specific needs. This folder should be under a “Resources” folder which will be selected during the creation of the documentation.
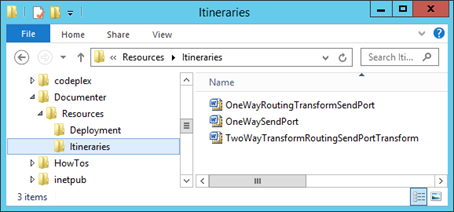
The last step is to be executed when generating the documentation. Under the “Output Options” page, in the “Advanced Documentation Options” section, the Resources folder which contains the Itineraries folder should be selected.
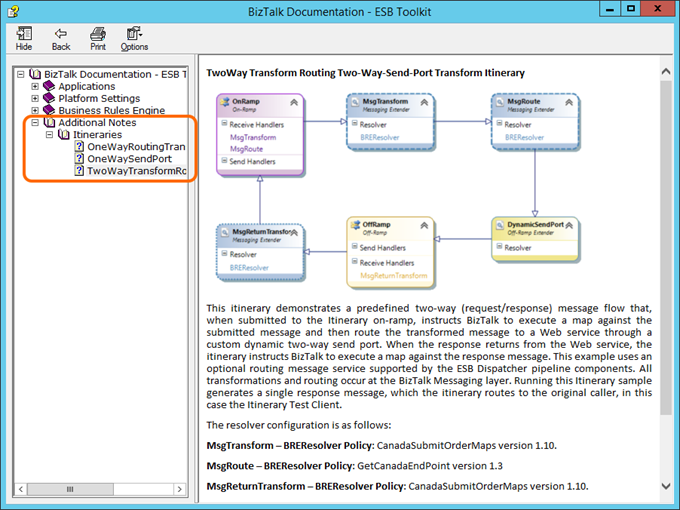
Doing so, the generated documentation should have the “Itineraries” branch under “Additional Notes”, and under this, the list of itineraries. This way, these important components of your BizTalk solutions are now part of your documentation.
##4. Document your Maps
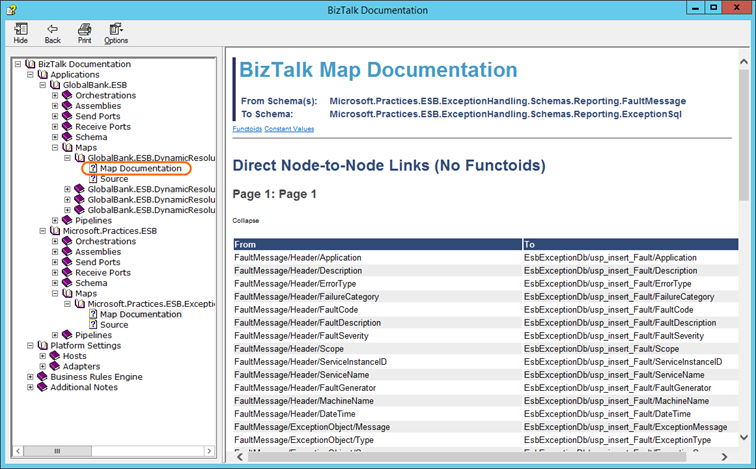
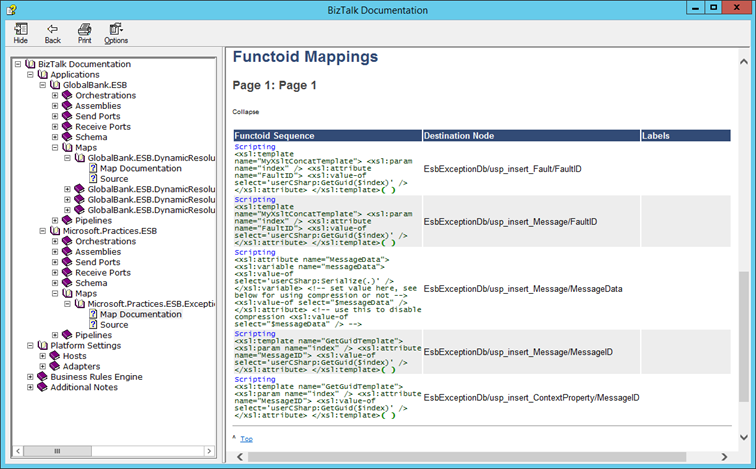
We have incorporated the functionality of another Codeplex project, the BizTalk Map Documenter, as part of the BizTalk Documenter. If you want to include documentation of your maps in more detail, the BizTalk mapper “.btm” source files must be available, and the following steps must be executed when generating the BizTalk documentation.
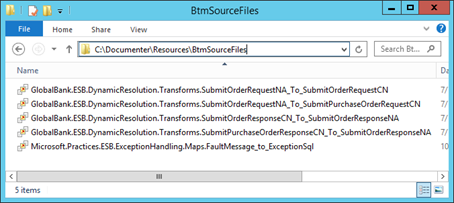
First, copy the BizTalk mapper files of the BizTalk Applications that are to be documented into a folder named “BtmSourceFiles”. Then, rename the maps so that they have the full name as they appear in the BizTalk Admin Console, but here including the “.btm” extension. And finally copy the “BtmSourceFiles” folder under your Resources Folder to be selected in the Documenter Output Options. The “BtmSourceFiles” name of the folder and the full name of the maps are required for the Documenter to be able to document in detail the maps.
In the following screenshots it can be seen the detailed BizTalk map documentation which you can expect. It shows direct links between source and target nodes, functoids, and constant values utilised in the map.
##5. Enrich your documentation with other relevant information
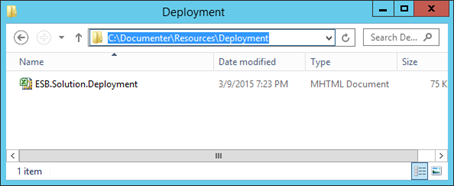
In the tip #3, I mentioned how you can include your itineraries as part of your documentation. In addition to that, you can enrich your documentation with any Word or Excel document saved as “.mht” file or any other html file which is relevant to your solution. As an example, you could include the SettingsFileGenerator file of the BizTalk Deployment Framework. You just need to open it on Excel and save it as “.mht” file. This file must be saved in the corresponding folder under your Resources folder selected when you create the BizTalk Documentation. This way, your settings for Deployment can be included in your documentation.

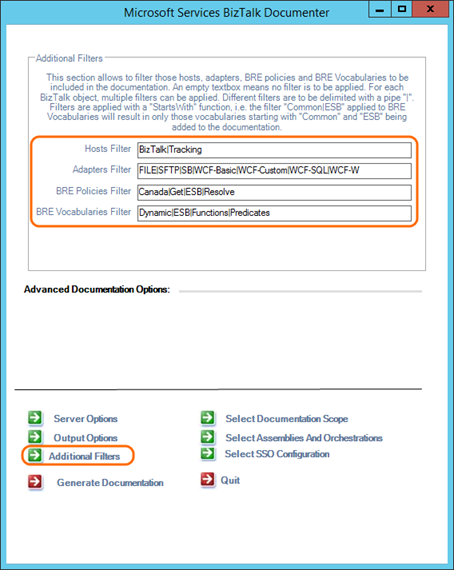
##6. Document only artefacts relevant to your solution
| Previous versions of the BizTalk Documenter allowed you to select those BizTalk applications to be included in the documentation. However, the Platform Settings and Business Rule Engine sections of the generated documentation always included all hosts, adapters, policies and vocabularies. In some projects, we had the need of documenting only those hosts, adapters, and BRE artefacts relevant to the solutions in scope. To satisfy this need, I added the “Additional Filters” page on the Documenter. On this page, you can filter hosts, adapters and BRE artefacts. Filters are applied using a “StartWith” function, which means that all artefacts starting with the filter will be included. Multiple filters can be defined using a “ | ” (pipe) delimiter. The following screenshots show the configuration and the output of this new functionality. |
##7. Put a nice cover to your documentation
The icing on the cake of a good documentation would be to put a nice cover which is aligned to your needs. To do this, you need to add a custom “titlePage.htm” file on the root of your Resources folder selected in the Output Options tabs. If you are using your own custom images, you need to add them to the same root folder.
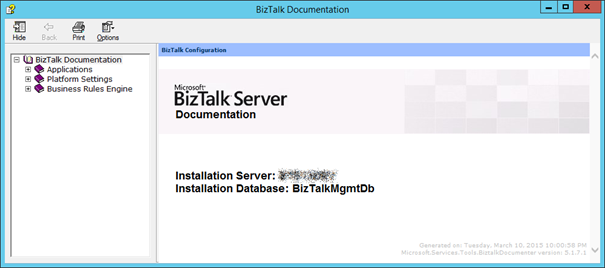
The default cover page and a customised one can be seen in the following two images.
The option of customising the cover page has been available since past versions of the Documenter, but in order to get the template of it, the source code has to be downloaded. In this link you can see and download the html template only which you can customise according to your needs.
Note that the template makes use of a stylesheet and images which are part of the documenter. You can use yours by adding them in the same Resources root folder. You can freely customise this html according to your preferences and needs. Make sure you name your “.htm” file as “titlePage.htm”.
I hope you find these tips useful and the BizTalk Documenter can help you to provide a comprehensive and quality documentation to your implemented BizTalk solutions. Please feel free to suggest to the team your ideas or improvements for the BizTalk Documenter on the Codeplex page
Cross-posted on Kloud's blog.
Follow me on @pacodelacruz.