Monitoring Azure WebJobs Health with Application Insights

Introduction
Azure WebJobs have been available for quite some time and have become very popular for running background tasks with programs or scripts. WebJobs are deployed as part of Azure App Services (Web Apps), which include their companion site Kudu. Kudu provides a lot of features, including a REST API, which provides operations for source code management (SCM), virtual file system, deployments, accessing logs, and for WebJob management as well. The Kudu WebJobs API provides different operations including listing WebJobs, uploading a WebJob, or triggering it. One of the operations of this API allows to get the status of a specific WebJob by name.
Another quite popular Azure service is Application Insights. This provides functionality to monitor and diagnose application issues and to analyse usage and performance as well. One of these features are web tests, which provide a way to monitor the availability and health of a web site.
In this blog post I will go through the required configuration on Application Insights to monitor the health of WebJobs using Application Insights web tests calling the Kudu WebJobs API.
Calling the Kudu WebJobs API.
For this exercise, it is worth getting familiar with the WebJobs API, particularly with the endpoint to get a WebJob status. Through this post, I will be working with a triggered WebJob scheduled with a CRON expression, but you can apply the same principles for a continuous WebJob. I will be using postman to call this API.
To get a WebJob status, we need to call the corresponding Kudu WebJob API endpoint. In the case of triggered WebJobs, the endpoint looks something like:
https://{webapp-name}.scm.azurewebsites.net/api/triggeredwebjobs/{webjob-name}/
Before calling the endpoint, we need to add the Authorization header to the GET request. To create the header value, we need to use the corresponding Kudu API credentials, as explained here. Considering we want to monitor the status of a WebJob under a particular web site, I prefer to use site-level credentials (or publishing profile credentials) instead of the user-level ones.
Getting the Publishing Profile Credentials from the Azure Portal
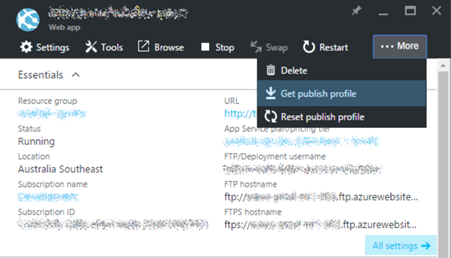
You can get the publishing profile credentials, by downloading the publishing profile from the portal, as shown in the figure below. Once downloaded, the XML document will contain the site-level credentials.

Getting the Publishing Profile Credentials via PowerShell
We can also get the site-level credentials via PowerShell. I’ve created a PowerShell function which returns the publishing credentials of an Azure Web App or a Deployment Slot, as shown below.
Bear in mind that you need to be logged in to Azure in your PowerShell session before calling these cmdlets.
Getting the Kudu REST API Authorisation header via PowerShell
Once we have the credentials, we are able to get the Authorization header value. The instructions to construct the header are described here. I’ve created another PowerShell function, which relies on the previous one, to get the header value, as follows.
Once we have the header value, we can call the api. Let’s call it using postman.

You should be getting a response similar to the one shown below:
Note that for this triggered WebJob, there are status and duration fields.
Now that we are familiar with the response, we can start designing an App Insights web test to monitor the health of our WebJob.
Configuring an App Insights Web Test to Monitor the Health of an Azure WebJob
You can find here detailed documentation on how to create web tests to monitor availability and responsiveness of web end points. In the following sections of this post, I will cover how to create an App Insights web test to Monitor the Health of a WebJob.
As we saw above, to call the WebJobs API we need to add an Authorization Header to the GET request. And once we get the API response, to check the status of the WebJob, we would need to interpret the response in JSON format.
To create the web test on App Insights to monitor a WebJob, I will first create a simple web test via the Azure Portal, and enrich it later.
Creating a Web Test on Application Insights.

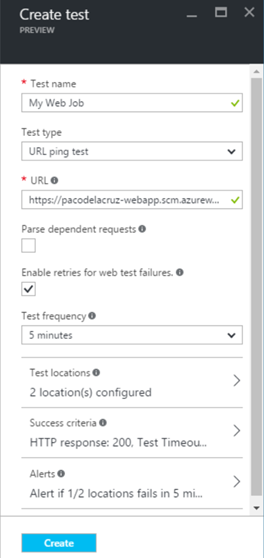
I will create a basic web test with the following configuration. You should change it to the values which suit your scenario:
- Test type: URL ping test
- URL: My WebJob Rest API, e.g. https://{webapp-name}.scm.azurewebsites.net/api/triggeredwebjobs/{webjob-name}/
- Test frequency: 5 minutes
- Test locations: SG Singapore and AU Sydney
- Success criteria:
- Test timeout: 120 seconds
- HTTP Response: (checked)
- Status code must equal: 200
- Content match: (checked)
- Content must contain: “status”:”success”
- Alerts
- Status: Enabled
- Alert threshold location: 1
- Alert failure time window: 5 minutes
- Send alert emails to these email addresses:
You could also keep email alerts disabled or configure them later.
If you enable the web test as is, you will see that it will start failing. The reason being that we are not adding the required Authorization header to the GET request.
To add headers to the test, you could record web tests on Visual Studio Enterprise or Ultimate. This is explained in details in the Azure documentation. Additionally, in these multi-steps web tests you can add more than one validation rule.
Knowing that not everybody has access to a VS Enterprise or Ultimate license, I will explain here how to create a web test using the corresponding XML format. The first step is to extract the web test XML definition from the test manually created on the portal.
Extracting the Web Test XML Definition from a Test Manually Created on the Portal.
Once we have created the web test manually on the portal, to get its XML definition, we have to open the resource explorer on https://resources.azure.com/ and navigate to subscriptions/{subscription-guid}/resourceGroups/{resourcegroup}/providers/microsoft.insights/webtests/{webtest}-{app-insights} until you are on the definition of the web test you have just created.
Once there, you need to find the member: “WebTest”, which should be something similar to:
Now, we need to extract the XML document by removing the escape characters of the double quotes, and get something like:
which is the XML definition of the web test we created manually on the portal.
Adding a Header to the Application Insights Web Test Request by updating the Web Test XML definition.
Now we should be ready to edit our web test XML definition to add the Authorization header.
To do this, we just need to add a Headers child element to the Request record, similar to the one shown below. You would need to get the Base 64 encoded Authorization header value, similarly to how we did it previously when calling the API via Postman.
Extending the Functionality of the Web Test.
When we created the web test on the portal, we said that we wanted the status to be “success”, however, we might want to add “running” as another valid value. Additionally, in my case, I wanted to check that duration is less than 10 minutes. For this I have updated the Validation Rules to use regular expressions and to have a second rule. The final web test XML definition resulted as follows:
You could play around with the web test XML definition and update or extend it according to your needs. In case you are interested on the capabilities of web tests, here the documentation.
Once our web test XML definition is ready, we save it with a “.webtest” extension.
Uploading the (Multi-Step) Web Test to Application Insights
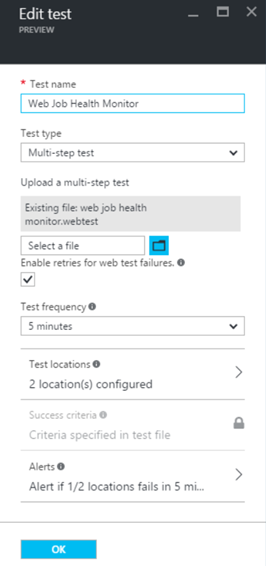
Having the web test XML definition ready, we can update our Application Insights web test with it. For this, on the portal, we open the Edit Test blade and:

- Change the Test Type to: Multi-step test, and
- Upload the web test xml definition file we just saved with the “.webtest” extension.
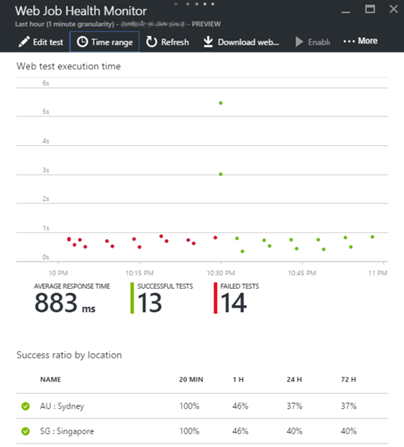
This will update the web test, and now with the proper Authorization header and the added validation rules, we can monitor the health of our triggered WebJob.

With Application Insights web tests, we can monitor the WebJob via the dashboard as shown above, or configuring alerts to be sent via email.
Summary
Through this post I have shown how to monitor the health of an Azure WebJob using Application Insights web tests. But on the journey, I also showed some tricks which I hope can be useful in other scenarios as well, including
- How to call the Azure WebJobs API via Postman, including how to get the Kudu API Authorization header via PowerShell.
- How to manually configure App Insights web tests,
- How to get the XML definition of a manually created web test using the Azure Resource Explorer,
- How to update the web test XML definition to add a requestheader and expand the validation rules. This without requiring Visual Studio Enterprise or Ultimate, and
- How to update the Application Insights web test by uploading the updated multi-step web test file.
Thanks for reading, and feel free to add your comments or queries below.
Cross-posted on Kloud's blog.
Follow me on @pacodelacruz.